


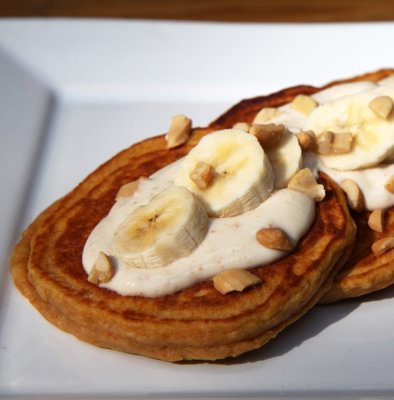
Pancakes:
1 1/4 cups whole wheat flour
2 teaspoons baking powder
1/2 teaspoon salt
1 tablespoon brown sugar
1/2 cup mashed baked sweet potato
1 egg
1 1/4 cups skim milk or soy milk
1/2 teaspoon cinnamon
1 banana, diced
Yogurt sauce:
1 6-ounce container of plain nonfat Greek yogurt
2 tablespoons skim milk
1 tablespoon peanut butter (or almond butter)
2 teaspoons honey


It’s easy to get busy and either make poor nutrition choices, or skip meals all together. Thinking ahead and giving yourself healthy options that you can quickly grab, even when your schedule is hectic, is a good way to make it easier to eat clean and maintain a healthy bodyweight.
Here’s why this is a good option for a snack or meal (if you eat a few of them)
What you’ll need:
1 Large onion, diced
8 Ounces Mushrooms, chopped
1 Tbsp Olive oil
1 Tbsp Italian seasoning
2 Garlic cloves, minced
Salt and Pepper to Taste*
4 Cups of Spinach
12 Eggs
Saute all of the vegetables in the olive oil on medium heat. Once the onions are browned or transparent, add in the spinach and cook for a couple more minutes. Move the sauteed veggies to a mixing bowl, add the eggs and mix thoroughly. Pour the mixture into a greased muffin tin, or use baking cups as a base to keep them from sticking – we used paper cups, which worked, but tin foil would probably result in less sticking. Cook in the oven for 20-24 minutes at 350 degrees, using the toothpick trick to make sure that the center of the quiche cup is cooked all the way through.
Cool for 5 minutes before serving.
Modifications/Variations: We didn’t add any extra salt to ours, so the sodium is nice and low. If you can, it’s a good idea to bump up the flavor with other spices – garlic, basil, oregano, cumin, chili pepper, paprika, pepper, or anything else you might like. There are a lot of different, equally tasty ways to make this recipe. Add in any kind of vegetables you might have around the kitchen; tomatoes, asparagus, artichoke, and peppers are just a few of the veggies that would taste great. You can also make it more indulgent by adding cheese of your choice (to the mix, before you put it in the muffin tins).
Makes 12 Mini Quiches
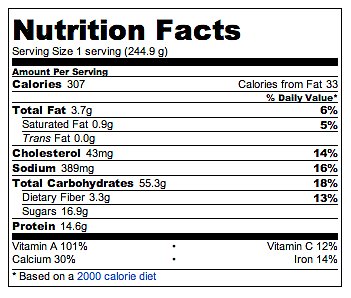
Nutrition Information (1 mini quiche)
Calories: 90
Total Fat: 6 g
Saturated Fat: 1.6 g
Cholesterol: 162 mg
Sodium: 71 mg
Total Carbohydrates: 2.9 g
Dietary Fiber: .7 g
Sugars: 1.4 g
Protein: 6.8 g
Vitamin A: 25%
Vitamin C: 9%
Calcium: 5%
Iron: 10%

Fresh corn, tomatoes, onions, and parsley are tossed with a sweet-hot vinaigrette to make this favorite summertime salsa. Pair with tortilla chips for a colorful appetizer or serve alongside grilled burgers, chicken, or ribs.
Outstanding
Many of us lead busy lives and everyone, especially those of us with families, is trying to get dinner on the table as quickly and easily as possible. Occasionally we fall back on using prepackaged meals from the grocery store or calling for takeout. Those meals have more fat, salt and sugar than we need, they produce a lot of garbage from the packaging and they are more expensive than cooking from scratch.

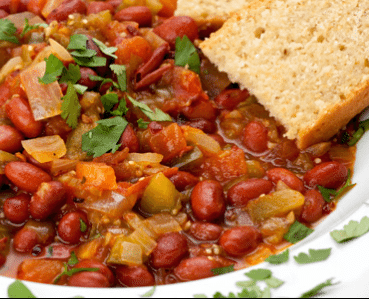
Vegetarian Chili


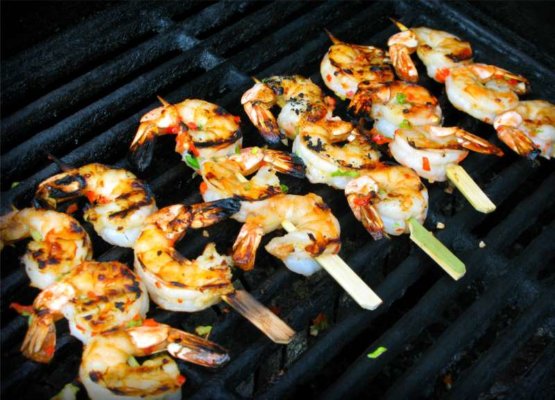

As we begin July’s month of grilling as we’ve done in the past, I thought I’d start off with a dish which is very easy to prepare and has the wonderful flavors of the Caribbean in every bite. Don’t be intimidated with the amount of scotch bonnet pepper we used as it’s well balanced with the earthy sweetness of the honey. If Tehya can come upstairs with clean bamboo skewers in hand and say “dad this shrimp was on point!”, I’m sure you can handle the little Caribbean sunshine of it all.
You’ll need…
1 pound large shrimp or prawns, peeled and deveined (16-20)
2 tablespoon honey
2 tablespoon olive oil
2 Scotch Bonnet pepper, diced
1 teaspoon fresh minced garlic
1 scallion chopped finely
* pinch of sea salt (or any salt you have)
Notes: Wear gloves when handling scotch bonnet peppers and do remember to wash your hands immediately after with soap and water. Do NOT include any of the seeds and white membrane surround the seeds if you’re overly concerned about the raw heat.
If you’re not sure how to peel and devein shrimp, watch this video…
There are really just two steps to preparing this dish (marinate and grill).. So let’s start off by marinating the shrimp. In a strong zipper bag or plastic container, place the cleaned shrimp and all the other ingredients. Give it a good toss and store it in the fridge for one hour.


As the shrimp marinates, I’d recommend soaking the bamboo skewers in water to help prevent them from burning while on the grill. After one hour, it’s just a matter of threading the shrimp onto the skewers and heading out to a relatively hot grill. If you have a grill pan, you can certainly make these indoors on your stove.
When I cleaned my shrimp I left a little bit of the tail/shell on, just for presentation purposes.. the choice is yours.
Lightly grease your grill surface to prevent sticking (I used cooking spray, but you can dampen a paper towel with vegetable oil and brush) then place the skewers on (medium/low flame) on one side for 3-4 minutes.


After which you’ll then flip them over and cook for another couple minutes. Try not to over-cook them and pay attention to any flare-ups which may cause them to burn. The lid of my grill was covered during the grilling process . Remember they will continue cooking with its residual heat after removing off the direct flame, so factor that in so you don’t end up with rubbery shrimp at the end.


Squeeze on some fresh lemon juice and enjoy! I got 5 skewers with the one lb of shrimp and that’s pretty much enough for 5 people (1 skewer had only 2 shrimp though). Your guests will be raving after just one bite, so I would definitely double up on the recipe (just the shrimp as there will be enough marinade) to accommodate their immediate addiction.
Don’t forget to check back all of this month for more exciting and taste-bud challenging recipes off the grill!
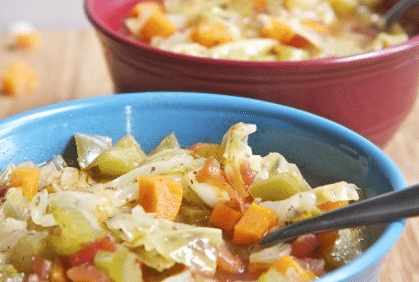

1/2 head chopped cabbage
1 cup yellow or white onion, diced
1 green bell pepper, diced
1 cup celery, chopped
1 cup carrots, sliced
1 large can stewed tomatoes, I use the ones with spices added
cracked black pepper to taste
garlic to taste
other seasonings as desired, I use some basil, red peppers, whatever looks good, this is one of those things that it rarely is exactly the same thing twice
hot water, 1-2 cups
When you start putting vegetables in your stock pot they take up quite a bit of room. A trick I learned from my sister is to chop and add as you go, start with cabbage and pour your hot water over that right away to help it start to cook down. Heat on medium-high heat until boiling, reduce heat, cover and simmer until vegetables are as tender as you like. That’s it. Your whole house will smell amazing. I like to use it as a pre-dinner soup, it has no protein so obviously you can’t eat just this, it will fill you up so you have less room for other stuff!

One of my favorite guilty pleasures is buffalo wings, especially dipped in blue cheese dressing. There’s something about the buffalo chicken and blue cheese combo that really appeals to me and I had a craving for it lately. When I came across a recipe for ham and cheese stuffed pretzel bites, I figured I could substitute it with chicken and blue cheese. That’s when I decided to make these Buffalo Chicken Bites… yum!
These are such an awesome snack, which could be a meal in itself if you have enough of them. It’s not hard since they are addictively delicious! I made a few changes to the original recipe aside from the filling substitution, including omitting the process of boiling the bites before baking. I feared the filling would ooze out during the boiling process so I just baked them after filling and they came out perfectly.
I plan on making these again and experimenting with other fillings such a steak, provolone, sauteed peppers and onions for Philly Cheesesteak Bites… or even pepperoni, italian sausage, mozzarella and mushrooms for Pizza Bites. The filling ideas are endless!
Recipe from Joelens
1 cup finely diced cooked chicken breast
1/2 cup crumbled blue cheese
2 tablespoons shredded cheddar cheese
1/4 cup hot sauce (Frank’s brand is what I used)
4 tablespoons unsalted butter, melted and cooled
2 1/4 teaspoons rapid rise dry yeast
2 tablespoons brown sugar
1 cup warm milk ( I used 2%)
2 1/2 cups of flour
To make the buffalo chicken mixture, in a small bowl, combine the chicken, blue cheese, cheddar cheese, melted butter and hot sauce; set aside.
In a 1 cup measuring cup, heat the milk and then add the 2 tablespoons brown sugar; stir into warm milk until dissolved; place in the bowl of a stand mixer fitted with the dough hook.
Add 2 1/2 cups flour and yeast to the stand mixer and mix on low speed until a soft dough forms, adding up to 1/2 cup additional flour, a little at a time, if necessary. Allow the dough to knead in the stand mixer for 5-7 minutes. Turn out dough onto a lightly floured surface and gently knead a few times to form a smooth ball. Place dough into a clean bowl that’s been lightly oiled. Cover with plastic wrap and let rise in a draft-free place at warm room temperature until doubled and bubbles appear on surface, about 2 hours.
Preheat oven to 400°F with rack in the middle of the oven. Line a baking sheet with parchment paper; set aside.
Turn out dough onto a lightly floured surface and cut into 4 equal pieces. Lightly dust your hands with flour, then gently roll and stretch 1 piece of dough to form a 12-inch-long rope. Flatten dough and arrange so a long side is nearest you, then roll out to a roughly 12- by 4-inch rectangle with a lightly floured rolling pin. Gently press one fourth of buffalo chicken mixture into lower third of rectangle, leaving a 1/2-inch border along bottom edge. Stretch bottom edge of dough up over filling and press tightly to seal, then roll up as tightly as possible to form a rope. Cut rope into 12 pieces and transfer to a sheet pan. Make 3 more ropes with remaining dough, filling and cut into pieces, transferring to sheet pans. Let rest at room temperature, uncovered, 30 minutes (dough will rise slightly).
Bake buffalo chicken bites in the preheated oven for 5-7 minutes or until the tops are lightly browned. Remove from oven (some cheese may have melted out.) and brush tops with melted butter before serving (optional).

Hands-on time: 15 minutes.
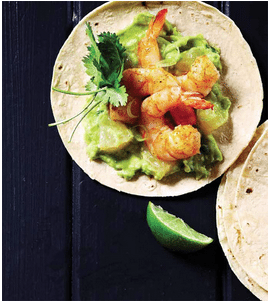
Total time: 45 minutes.Juicy grapefruit and lime brighten up these fresh and light shrimp tacos.
INGREDIENTS:
• 1 large grapefruit
• 2 cloves garlic, minced, divided
• 450g large uncooked prawns, peeled, deveined and tails removed
• ½ cup thinly sliced green onions, divided
• 1 tsp chilli powder
• ¼ tsp sea salt
• 1 lime, zested and juiced
• 1 avocado, peeled and pitted
• 8 15cm corn tortillas, warmed
INSTRUCTIONS:
ONE : Zest grapefruit and set zest aside in a medium bowl. Segment grapefruit: With a paring knife, slice off ends and remove pith, working from top of fruit to bottom. In a wide shallow bowl, use a knife to make incisions along membranes toward centre of fruit and cut segments free. Cut into bite-size pieces. Reserve juice in bowl and transfer segment pieces to bowl with zest.
TWO : To bowl with juice, add half of garlic, prawns, ¼ cup onions, chilli powder and salt; toss to combine. Cover and refrigerate for up to 30 minutes.
THREE : Prepare guacamole: To bowl with segments and zest, add remaining half of garlic and ¼ cup onions. Stir in lime zest and juice, then smash avocado into mixture with a fork or the back of a spoon to form a chunky guacamole. Cover tightly and refrigerate until needed. (Guacamole should be eaten within 2 hours of preparation.)
FOUR : Heat a large frying pan on medium-high. Add prawn mixture and sauté, stirring frequently, until prawns are pink and cooked through, 3 to 5 minutes. Spread guacamole over tortillas and top with shrimp, dividing evenly.
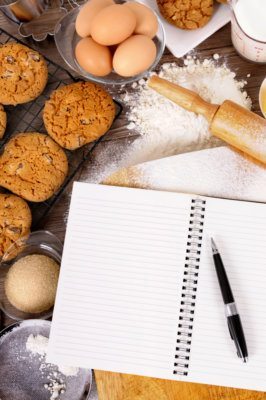
Working on a new bake book, my obsession with creating the almost-perfect recipe for chocolate chip cookies probably goes a bit deeper than most people. Some people even consider it a bit odd. Nonetheless, my efforts benefit my roommates, family and friends with tried-and-true recipes and a plateful of cookies. I have been recipe testing the “ultimate home chef’s chocolate chip cookie” recipe for the past few weeks. I think I’m close to calling this one my favorite recipe.
Being a home chef is not only about creating something delicious from raw ingredients. The home cook knows there is more that happens in the kitchen. Something happens to me. Something happens to the other people who share the space and the food. The art and science of food preparation builds not only good food, but wonderful memories and relationships.
Magic happens when people come together in the kitchen and mix laughter with chopping nuts and chocolate, talking about the day with measuring flour and vanilla. How does one create the almost perfect chocolate chip cookie? Just follow this recipe: people + good recipe + working in the kitchen = the almost-perfect cookie and a near-perfect experience.
Whether you are cooking something savory or baking something sweet, I hope you take the chance to pull someone into the kitchen with you and enjoy the beauty of delicious food and nurturing relationships this weekend.
Melissa’s Ultimate Soft & Chewy Chocolate Chip Cookies
¾ cup white sugar
¾ cup dark brown sugar
1 cup (2 cubes) butter, softened
2 eggs at room temperature (pull out eggs about 40 minutes before putting together the batter)
2 tsp. vanilla
1 tsp. baking soda
½ tsp. baking powder
1 tsp. salt
2 ½ cups of flour
1 bag (12 oz.) of chocolate chips – pick your personal favorite: semi sweet; dark chocolate
Preheat the oven to 350F.
Mix the sugars and the butter together until they are creamed together. Add the eggs and vanilla and stir until blended. (You can use a beater too. It does make everything a bit faster!)
Add in the salt, baking powder and baking soda and stir. Add in the flour one cup at a time and mix until the flour is completely dissolved into the batter. Fold in ¾ of the bag of chocolate chips.
You can use a variety of things to scoop the dough onto the cookie sheets. I like my cookies to look very pretty and round so I roll the dough in my hands – about the shape of walnuts. You can use a teaspoon for a similar size.
Take some of the leftover chocolate chips and smoosh them gently into the top of the cookies. This is a completely “let’s make these cookies prettier” step. If you don’t want to do this, simply add all the chips to the batter. I like to have chips sticking up out of my cookies.
Bake the cookies for 9 to 11 minutes. If you like your chocolate chip cookies on the chewy side, take them out at 9 minutes. If a crispier cookie is your preference, leave them in for 11 minutes. Be careful if you like them crispier. It is easy to go from crispy to burnt in less than a minute!
Let the cookies sit on the cookie sheet for one minute before moving them to the cooling rack. Removing the cookies off the cookie sheet too soon will cause them to fall apart. If the cookie rack has gone MIA or is being used as a landing pad for the Lego tower, foil or paper towels work well.
Enjoy the cookies warm or keep them in an airtight container to eat over the weekend. Chocolate chip cookies freeze beautifully. The literature tells me frozen cookies retain their freshness for up to 6 weeks. I will have to take the experts at their word because cookies never last that long in my freezer.
Melissa is a freelance writer, blogger and enthusiastic home chef. You can follow her on Twitter @melissauclair or find her at http://www.launchyourcreativelife.com where she writes about working towards the location independent lifestyle.
What to do when you want to make a good dinner that doesn’t require a) going to the store b) buying pizza and c) not breaking the financial or health budget for the week?
Try a Friday Night Stir Fry.
Stir fry is one of my favorite dishes to make. The name is vague because it is variable dish (I love that); it’s easy and budget friendly.
Plus, a stir fry is a great way to start experimenting in the kitchen (if you are a newbie to the kitchen). Stir fry is also a great way to consume vegetables that are one day away from questionable. As Grandma used to tell me, “Waste not, want not.”
Basic stir fry is made of three things: meat, vegetables, spices. I make a side of rice to go with it for a complete, healthy, tasty meal. Some people like to add noodles. You’re the chef. You get to make the decisions. Let’s go!
Ingredients
In a large pot, boil the chicken for approximately 40 minutes. Chicken creates a pleasant meaty aroma when it is close to being done. However, to ensure “doneness,” spear a piece of chicken with a fork and bring it up out of the water.
One of two things should happen. First, there should be no redness around the part of the chicken where the meat hits the bone. If there is, boil it for a few more minutes. The second confirmation of a done chicken is when it comes off the bone as the fork pulls it up out of the boiling water.
Note: It’s important to eat chicken that has been cooked all the way through.
In a medium sized pot, boil 4 cups of water. When the water is boiling, add in two cups of rice and place the lid on. I use the broth from the chicken as the water for the rice. This makes the rice very tasty. Set the timer for 20 minutes.
Red onions, yellow onions, carrots, celery, mushrooms, squash, green onions, asparagus, snow peas, peppers (any and every color), broccoli, white sprouts, eggplant, summer squash, water chestnuts.
While the chicken is boiling, I begin to wash and chop all the vegetables. I pile them separately.
About the time the chicken is done (about 40 minutes), I put on the water to boil for the rice. After boiling the chicken, chop it up and set it aside.
I use a wok or a large, shallow pan over medium heat and put in 4 Tbs. of olive oil. I add in the onions and let them sauté for about 7 minutes.
Next, I add in the rest of the vegetables. The pepper and other spices go in too. I add about ¼ cup of the chicken broth to create a nice broth.
I let the vegetables stir fry for about 15 minutes. The timing can depend on the ratio of pan space to the amount of vegetables. Fewer vegetables in a large pan will heat up quickly while lots of vegetables will take a few extra minutes. The vegetables are close to being done when they begin to fill the kitchen with a very fragrant, rich smell. The onions will have browned and so will the edges of the other vegies.
Spicing stir fry: I keep my spices mild- a bit of soy sauce, teriyaki sauce and pepper. If you want to add a bit of a kick, mix the red pepper flakes into a 1 Tbs. of soy sauce or oyster sauce. Pour on and mix in the spices.
If the stir fry looks too juicy, mix 1 Tbs. of cornstarch in 2 Tbs. of water and mix into the stir fry. This will thicken the broth up slightly. (Don’t worry- it won’t turn to gravy!)
Be like Julia Child when you cook! Spoon out a bit of the stir fry and taste for seasoning.
My rule of thumb is to start mild in the amount of seasonings and then add more as they are needed. It is a lot easier to add in spices than try to dilute too much soy sauce or red pepper flakes.
Other fun options for stir fry: Add nuts or pineapple for a fun topping. Noodles are a fun addition, especially if the kids in the family are big noodle fans.
This is the beauty of the Friday Stir fry: I can add and create the stir fry regardless of what I have. And stir fry turns out good every time.
Happy Friday!
Melissa AuClair blogs about her experiment in moving from a day job to a lifestyle business at http://www.launchyourcreativelife.com When she isn’t planning her move from a day job to a lifestyle design business -and encouraging women in their pursuit of their dreams- she is baking and dabbling in watercolors(and that gets onto the blog too).

Happy Super Bowl Sunday to everyone! It’s that special day of the year for sports that has something for everyone. Maybe your team is finally in the big game or maybe you’re a diehard football fan and just want to see a good matchup. Maybe you’re the occasional fan who makes the day more interesting with Super Bowl pools or maybe you’re just in it for the commercials and the half time show. And if none of that interests you, there is still the food. Oh the glorious amounts of super eats for Super Bowl Sunday!
No Super Bowl party is complete without its share of tailgate delectable. Buffalo wings are a staple today. Other fan favorites can be chilli, seven layer dip, pizza, jalapeño poppers or whatever else you’re into. It’s a day certainly built around eating foods you don’t need a table for. Just a napkin, maybe, and your mouth. But me, I’m a burger man so today I’ll be making my take on Wendy’s bacon mushroom cheddar melt. And I don’t usually do this but today I will make an exception. I’m going to tell you just how to prepare this artery clogger of deliciousness.

The first thing we need to talk about is what we do to prepare the burgers. It’s still early so quick, run and get yourself a bottle of Samuel Adams. No, don’t drink it! Pour that brew into a ziplock bag with some sirloin burgers. Use a second bottle if one was not enough to submerge the burgers like a marinade. Sam Adams is a strong beer but it is also one of the worlds most tastiest beers and when the alcohol cooks off, it’s going to give the burger a nice sweet taste. Oh and let’s not forget that Sam Adams is made right here in the USA. So once we’ve marinated our burgers in America’s finest beer and we are ready to grill them up, only season with some salt and pepper and throw them on the grill. If no grill, use a pan. It’s all good.
I don’t want you to make a rookie mistake here, don’t flip the burgers too much, you’ll dry them out and then you might as well just buy them from Wendy’s. While you’re burgers are going or even a little while before, you should be sizzling up some bacon and sautéing some mushrooms. And in a small pot or sauce pan goes a can of Campbell’s cheddar cheese soup. This soup is the perfect consistency to match Wendy’s cheese sauce.
After my mushrooms are sautéed, I like to dice em up and throw them into the soup. So once everything is done and your burgers are just about done, place a thin slice of cheddar cheese on each burger. To assemble this treat, start with your bottom bun. Place a bit of the cheese sauce on the bottom of the bun followed by your sirloin burger. Then the bacon is placed on the burger and over the bacon goes a healthy scoop of your cheese and mushroom sauce. Top with the bun and enjoy! But have plenty of napkins because its about to get messy. I hope I’ve given you guys and gals a good suggestion for your Super Bowl feast.
Everyone out there, we at EZKOOL.com wish you an enjoyable and safe Super Bowl Sunday!


