Categories
Food And Recipes

Key Lime Pie in 3 Easy Steps

Key lime pie is a delicious dessert that is deceptively easy to make.

My mom and I love this dessert and I used to make it every spring and summer for her when I visited.  If you enjoy a citrus twist in your dessert, I think this will be go-to recipe for you.  (It could even turn into one of your “signature dishes”).

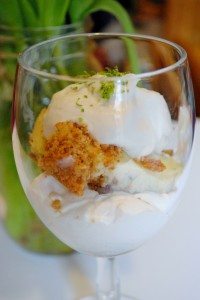
A side note about this dessert- use whatever dish you have available:  A traditional pie plate is wonderful but I will use an 8×8 for key lime squares if I don’t have a pie plate on hand.  An additional reason to use an 8×8 is to scoop the pie into champagne glasses for a fancy dessert at an event or elegant party.

Home Cook’s Note: there is a printable recipe at http://www.bakeperfectcookies.com

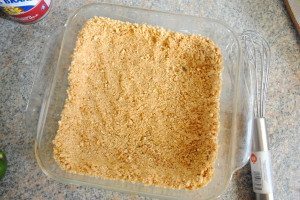
Step 1- Make the crust

Preheat the oven to 350 degrees.

Take 12 graham crackers and put them in a large Ziploc bag.  Take a rolling pin and roll over the graham crackers until they are finely crushed.  *If you don’t have a rolling pin, use a drinking glass cup.

Melt 2 Tbs. butter. In a medium sized bowl pour in the graham cracker crumb s, melted butter and 2 tsp. sugar.

Mix the ingredients together until they are a crumbly, moist mix (I often use a fork to accomplish a streusel looking mix).

Dump the mixture into the pie plate or 8×8 bake dish.  With your hands or the bottom of a measuring cup, press the graham cracker mixture firmly on the floor of the pie pan and up the sides about ½ inch.

Bake at 350 for 14 minutes.

Step 2- Make the filling

While the crust is baking, mix 3 egg yolks in a bowl.

Add in 1 14 oz. can of condensed milk. With a whisk, mix the egg yolks and condensed milk.

In a measuring cup, pour ½ cup of key lime juice.  If key lime juice is unavailable, regular lime juice will suffice just fine.  Add in half of the key lime juice (1/4 cup) to the egg yolk and milk mixture.  Whisk the juice in.  Then, add in the other half.

Take one lime and grate 1 tsp zest. 

A quick lesson about zest:  After washing the lime, grate just enough of the outside layer to get the green off.  Once you see white, stop grating.  It’s not unusual to grate ½ of the outside of the lime to get a tsp. of lime.

Add the zest to the mix and whisk a few times.

Your pie filling is ready!

Once the pie crust comes out of the oven, pour the pie filing into the crust and put it right back into the oven for 20 minutes.

After 20 minutes, pull out the pie and allow it to cool for 20 minutes.  Then, put the pie in the refrigerator for at least 2 hours for chilling.

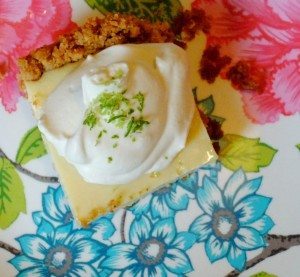
Step 3 Top it Off and Serve!

Take a pint of heavy whipping cream and beat it until it starts getting stiff.  (Regular whipping cream will work too- you have to beat it a little bit longer).

You can tell the whipping cream is ready by doing this test.  Stop the beaters.  Take the end of the beater and dip it into the whip cream and quickly pull out the beater. Do little “mountain peaks” remain in place?  If the whip cream doesn’t keep its form, keep beating.

When the mountain peaks appear, add in 1 tsp. vanilla and 2 heaping Tbs. powdered sugar.  Mix in just until blended.

Now for the fun part; throw the whip cream onto the pie. If you have some extra zest left, sprinkle it in the middle for an aesthetically pleasing touch.

Note:  If you are serving the pie individually, as I did in champagne glasses, scoop the pie into the glasses before adding the whip cream.

The first time I made this dessert I felt a little scrambled.  I had never made a pie like this before and the technique of making a pie crust and filling is different than a batch of cookies. However, once I discovered how easy it was I had so much fun making it again and again.

People think you’ve slaved over this recipe!  It tastes better than many key lime pies I’ve tasted in restaurants (and made quite a few dollars for).

Hope you like it.  And, if you have any questions about the recipe, feel free to email me at Melissa@bakeperfectcookies.com

Categories
Food And Recipes

How to Make a Fabulous Zucchini Dinner

Spring is officially here and with spring come different vegetables to eat, cook and enjoy.

I want to share one of my absolute favorite vegetarian dishes with you.  It’s fairly easy to make, but after tasting it, your friends and family will think you are a gourmet cook- it is that good.

But first, a story.

My beloved grandfather, Grandpa H, was a cook in the navy during World War 2.  He cooked for an enormous amount of people day in and day out.   As a little girl I loved listening to the stories about the grueling schedule, the massive quantities of food made and the different meals he made as a navy cook, like roasting 100 turkeys for Christmas dinner or making dozens of cinnamon rolls (from scratch!)

The experience in the navy combined with working in high end restaurants in San Francisco, CA gave him an edge and special knowledge of working with food for the rest of his life.

Grandpa H.  could go to a restaurant, eat a meal and figure out the cook made it.  He could discern what spices were used.  He figured out the method and the ingredients.

Grandpa didn’t tell anyone his insight into a restaurant meal; if he liked something he went home and made it.  If he didn’t like something, he would just change it.  And it would taste great, better than the restaurant.

The following recipe was developed in just this manner.  The restaurant serving Baked Zucchini has long since closed its doors- probably several decades ago.  And to be honest, I don’t know the name of the restaurant.

So now I call this recipe, “Ed’s Baked Zucchini” in honor of my grandpa.

Ed’s Baked Zucchini

Budget Friendly:  Yes, especially if the vegetables can be bought at a Farmer’s Market

Complicated:  Medium, but doable for the novice home cook

Dishes Required:  Medium

Time:  An hour plus baked time.  However, once you make it a few times, it’s a fairly easy to put together and I’m confident you can do the prep work in about 25 minutes.  (my time to do it now).

First, you want to gather all your ingredients.  It’s easy to forget something as the mixing, sautéing and preparing begin.

Ingredients

4 Large Zucchini (the bigger the better)
6 slices of bread (whole wheat bread works really well) cubed into small pieces
1 onion
2 heads of garlic
2 Tbs. butter or olive oil
2 eggs
¼ salt for sauté
½ Tsp. Salt
¼ Tsp. Pepper for sauté
2 Tsp. (heaping) Italian Seasoning
½ cup Monterey Jack Cheese
Parmesan cheese
Paprika

Instructions

Cut the ends of the zucchini and slice them lengthwise, like a loaf of bread.  Set a large pot of water (Dutch oven size) on the stove to boil.  Add the zucchini and put the lid on.  Wait for the water to boil and then stick a fork into one of the spears of zucchini.  It should be firm but easily pierced.  (It takes about 25 minutes for this.   Another way to know the zucchini are almost done – the whole kitchen will fill with the fresh aroma of zucchini, much like fresh corn when it is boiled).

While the zucchini is boiling, chop the onion and garlic until they are in very small pieces.  In a small sauté pan, place 2 Tbs. of butter or olive oil and the onion and garlic.  Add the salt and pepper.  Allow the mixture to sauté for about 7 to 9 minutes.  The onions will become light brown and quite fragrant.

Preheat the oven to 350 F.

In a large mixing bowl, add the cubed pieces of bread, the cheese, the Italian seasoning, ½ tsp of salt.  Add the sautéed onions and garlic.

By this time, the zucchini should be done.  Drain the water and have a 9×13 baking dish ready (you may need an additional 8×8 depending how long the zucchini are).

Take the zucchini and scoop out their soft fleshy insides and add it to the mixing bowl.  The zucchini are HOT.  I typically hold the hot zucchini with one hand wrapped in a hot pad (just toss the hot pad into the wash when done).

Place the shells of the zucchini in the 9×13 baking dish.

Mix together everything in the mixing bowl.  Add in the eggs.

Spoon the mix into the zucchini shells.  Top with crumbled parmesan cheese.  (My family used Kraft Parmesan Cheese for years).  Lightly sprinkle paprika on top.  (optional- it is nice for color)

Bake for 25 minutes.

Enjoy!

This is one of my all-time favorite spring and summer recipes.  The process sounds complicated but it is more labor intensive (chopping an mixing) than difficult in technique.   To cut down on the work, grab a friend or family member for help.  Between two people, the chopping, mixing and dishes will be done in no time!

And then you can get on to the best part- the eating!

Don’t let the “vegetarian” aspect of this meal fool you.  It’s a fairly filling dish.  All that is needed is a lovely side salad.  Add a strawberry shortcake for dessert and it’s the perfect menu for a weekend meal.

Melissa AuClair works by day as a skin care and cosmetic consultant and a blogger and writer moving towards a location independent lifestyle by night.  You can follow her on Twitter @melissaauclair or on her blog http://www.launchyourcreativelife.com/blog 
Exit mobile version